7 Contrast Techniques That Enhance Map Readability
Why it matters: Poor map contrast makes data visualization worthless—your audience can’t extract insights from maps they can’t read properly.
The big picture: Professional cartographers and data visualization experts rely on specific contrast techniques to ensure their maps communicate effectively across different devices and viewing conditions.
Explore and map the wilderness for the Queen in Cartographers! Draw unique terrain shapes and score points based on randomly selected goals each game, but beware of monster ambushes.

What’s next: These seven proven contrast methods will transform your maps from confusing visual noise into clear communication tools that actually serve your audience.
Disclosure: As an Amazon Associate, this site earns from qualifying purchases. Thank you!
P.S. check out Udemy’s GIS, Mapping & Remote Sensing courses on sale here…
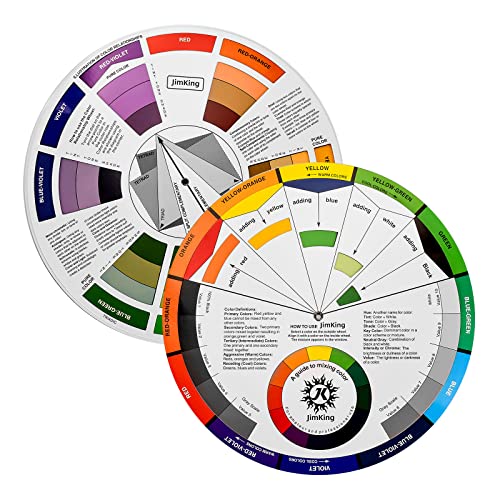
Color Contrast: Leveraging Hue Differences for Visual Separation
Color contrast forms the foundation of effective map communication. Strategic hue selection creates visual hierarchy that guides your audience through complex geographic information with clarity and purpose.
Using Complementary Colors for Maximum Impact
Complementary colors sitting opposite on the color wheel create the strongest visual separation in your mapping projects. You’ll achieve maximum contrast by pairing blue with orange for water features against urban areas, or red with green for highlighting critical zones against vegetation. These combinations work exceptionally well in QGIS and ArcGIS Pro when displaying categorical data like land use classifications. Avoid using red-green combinations for accessibility since colorblind users struggle with these pairings.
Easily organize and understand color relationships with this rotating color wheel. Ideal for artists and designers, it features a durable, UV-coated design for lasting use and clear color identification.
Applying Analogous Color Schemes for Subtle Distinctions
Analogous color schemes use adjacent hues on the color wheel to create gentle transitions perfect for continuous data visualization. You can represent elevation changes using blue-to-purple gradients for water depths, or yellow-to-red progressions for temperature mapping. This technique works particularly well in CartoDB and Mapbox Studio when creating choropleth maps that require smooth visual flow. Maintain sufficient lightness differences between analogous colors to preserve distinction across different viewing conditions.
Implementing High-Contrast Color Combinations for Accessibility
High-contrast combinations ensure your maps remain readable for users with visual impairments and various viewing environments. You should utilize dark blues (#003366) against light yellows (#FFFF99) or deep purples (#4A0E4E) with pale greens (#E8F5E8) to meet WCAG 2.1 standards. Test contrast ratios using tools like WebAIM’s Color Contrast Checker to achieve minimum 4.5:1 ratios. These combinations perform well across mobile devices, printed materials, and outdoor viewing conditions where glare affects readability.
Value Contrast: Manipulating Light and Dark Elements
Value contrast forms the backbone of effective map design by establishing clear visual hierarchy through strategic light and dark placement. This technique ensures your maps remain readable even when color information is lost or unavailable.
Creating Depth Through Light-to-Dark Progressions
Graduated value scales create visual depth that guides readers through elevation changes, population density, or data intensity levels. You’ll achieve optimal results by establishing your lightest values at 10-15% opacity and your darkest at 85-90% to maintain detail visibility. Progressive value steps should increase by 15-20% increments to ensure distinguishable differences across your data range. This systematic approach prevents visual confusion while maintaining clear categorical boundaries.
Using Black and White Foundations for Strong Contrast
Achieve a flawless, even complexion with e.l.f. Flawless Satin Foundation. This lightweight, vegan formula provides medium coverage and a semi-matte finish for all-day wear, while hydrating your skin with glycerin.

Pure black (#000000) and white (#FFFFFF) provide maximum contrast for critical map elements like boundaries, labels, and reference points. You’ll find these absolute values work best for highway systems, administrative borders, and essential text elements that require immediate recognition. However, reserve true black and white for your most important features—overuse creates visual tension that reduces overall map effectiveness.
Balancing Mid-Tone Values for Optimal Recognition
Mid-tone values between 40-60% gray create stable visual anchors that support both light and dark elements without competing for attention. You’ll use these neutral tones for secondary features like grid lines, minor roads, or background reference data. Strategic mid-tone placement prevents visual conflicts while maintaining clear separation between foreground and background information. Test your mid-tone selections at 50% zoom to ensure they maintain distinction across different viewing scales.
Texture Contrast: Adding Visual Interest Through Pattern Variation
Texture contrast transforms flat map surfaces into visually distinct areas that readers can differentiate instantly. Professional cartographers leverage pattern variations to create clear boundaries between regions while maintaining visual appeal across both digital and print formats.
Implementing Hatching and Cross-Hatching Techniques
Hatching provides powerful visual separation through parallel line patterns that create distinct textures for different map zones. You’ll achieve optimal results using 45-degree diagonal lines at 2-3 point intervals for primary areas, while cross-hatching at 90-degree angles works effectively for overlapping or secondary regions. Modern GIS software like ArcGIS Pro and QGIS offer customizable hatching symbols that maintain consistency across different zoom levels and output formats.
Using Dot Patterns and Stippling for Area Differentiation
Dot patterns create subtle texture variations that distinguish map areas without overwhelming other design elements. You can implement stippling techniques using dot densities of 15-20 points per square inch for primary differentiation, adjusting size from 0.5 to 2 points based on area importance. Professional mapping software provides stipple pattern libraries, though custom dot spacing often produces superior results for specific data visualization requirements and maintains clarity across various reproduction scales.
Applying Line Weight Variations for Boundary Definition
Line weight variations establish clear hierarchical boundaries through strategic thickness differences that guide reader attention. You should use 3-point lines for primary boundaries like state borders, 1.5-point weights for secondary divisions such as counties, and 0.5-point lines for tertiary features like watersheds. This systematic approach ensures consistent visual hierarchy while preventing boundary confusion, particularly when combining multiple administrative or natural feature layers in complex cartographic compositions.
Size Contrast: Scaling Elements for Hierarchical Clarity
Size contrast creates visual hierarchy through strategic scaling of map elements. You’ll guide readers through complex geographic information by varying the dimensions of symbols, text, and features based on their importance or data values.
Emphasizing Important Features Through Scale Differences
Scale your most critical map elements 2-3 times larger than secondary features to establish clear hierarchy. Capital cities should appear 200-300% larger than regional towns while maintaining proportional relationships. Rivers, roads, and boundaries follow similar scaling principles where major features dominate through size. You’ll create instant recognition patterns that help readers identify key geographic information without studying legends extensively.
Using Progressive Sizing for Data Visualization
Progressive sizing transforms quantitative data into visual patterns through systematic size variations. Population data works effectively with symbol scaling where each size increment represents specific value ranges like 50,000-person intervals. Graduated circles, squares, or triangles should increase by 25-50% increments to maintain readable progression. Export values, temperature ranges, and demographic statistics become instantly comparable through consistent scaling relationships.
Balancing Large and Small Elements for Visual Harmony
Balance prevents visual chaos by distributing scaled elements strategically across your map composition. Large symbols require adequate white space buffers of 15-20% their diameter to avoid crowding. Small supporting elements fill gaps without competing for attention when sized at 30-40% of primary features. You’ll achieve harmony through the 60-30-10 rule where dominant elements occupy 60% of visual weight, secondary features 30%, and accent details 10%.
Typography Contrast: Enhancing Text Readability and Hierarchy
Typography contrast forms the backbone of effective map communication by ensuring text elements remain readable across different scales and viewing conditions. Strategic font choices create clear information hierarchies that guide readers through complex geographic data.
Selecting Font Weights for Maximum Legibility
Bold text weights establish primary labels and critical information that readers need to identify immediately. Use bold weights for major cities, country names, and essential geographic features to ensure they stand out against busy backgrounds. Medium weights work effectively for secondary labels like regional towns and minor features. Light weights should be reserved for supplementary information such as coordinate grids and reference annotations, maintaining visual hierarchy while preventing text clutter.
Using Font Size Variations for Information Hierarchy
Size variations create systematic information ranking that helps readers navigate map content efficiently. Set primary labels at 14-16 points for major cities and countries, ensuring visibility at standard viewing distances. Scale secondary features to 10-12 points for regional elements like towns and geographic features. Use 8-10 point sizes for tertiary information including street names and detailed annotations, maintaining readability without overwhelming the map composition.
Combining Serif and Sans-Serif Typefaces Effectively
Sans-serif fonts provide clean readability for urban areas, road networks, and modern infrastructure labels where clarity is paramount. Combine these with serif typefaces for natural features like rivers, mountains, and historical locations to create visual distinction between human-made and natural elements. Limit your map to two typeface families maximum to maintain consistency while avoiding visual confusion that can distract from geographic information.
Saturation Contrast: Controlling Color Intensity for Focus
Saturation contrast manipulates color intensity to direct viewer attention through strategic vibrancy control. This technique separates critical map information from supporting elements by varying color purity levels.
Using Vibrant Colors to Highlight Key Areas
Vibrant colors draw immediate attention to your map’s most important features and data points. Use fully saturated colors at 90-100% intensity for primary elements like major highways, capital cities, or critical boundaries that require instant recognition. Reserve your brightest reds, blues, and greens for features that demand priority viewing. Limit vibrant colors to 10-15% of your total color palette to maintain their highlighting power. Strategic placement of these intense colors creates natural focal points that guide readers through your geographic narrative effectively.
Implementing Muted Tones for Background Elements
Muted tones provide visual stability without competing for attention against your primary map features. Set background elements like terrain, water bodies, and administrative boundaries at 30-50% saturation to create subtle context layers. These desaturated colors support your main content while maintaining essential geographic reference points. Gray-toned base maps work particularly well for supporting complex data overlays. Use muted earth tones for natural features and soft pastels for human infrastructure to establish clear visual separation between foreground and background information.
Balancing Saturated and Desaturated Color Combinations
Balanced saturation creates visual harmony while maintaining clear information hierarchy across your map composition. Apply the 70-20-10 saturation rule: use muted tones for 70% of your map area, medium saturation for 20%, and high saturation for 10% of critical elements. This distribution prevents visual fatigue while ensuring important features remain prominent. Test your saturation balance by converting your map to grayscale to verify that contrast relationships remain clear. Gradual saturation transitions between adjacent elements reduce harsh boundaries that can distract from your map’s primary message.
Shape Contrast: Differentiating Elements Through Form Variation
Shape contrast leverages geometric and organic forms to create immediate visual distinctions between map elements. You’ll find this technique particularly effective when color variations aren’t sufficient or when designing maps for accessibility requirements.
Using Geometric Shapes for Categorical Distinction
Geometric shapes establish clear categorical boundaries through distinct mathematical forms that readers recognize instantly. You can use circles for population centers, squares for administrative boundaries, and triangles for elevation points to create systematic visual classification.
Implement consistent shape hierarchies by scaling geometric forms according to data importance. Primary features should use bold shapes like filled circles or squares, while secondary elements work well with outlined versions or smaller geometric forms that maintain categorical clarity.
Implementing Organic Forms for Natural Feature Representation
Organic shapes mirror natural patterns found in topographic features, creating intuitive visual connections between map symbols and real-world elements. You’ll achieve better reader comprehension by using flowing, irregular forms for forests, water bodies, and geological formations.
Vary organic shape complexity based on map scale and feature significance. Detailed organic forms work effectively for large-scale maps, while simplified organic shapes maintain clarity at smaller scales without losing their natural character or categorical meaning.
Combining Angular and Curved Elements for Visual Interest
Angular elements contrast sharply with curved forms to separate human-made features from natural elements. You can use rectangular shapes for buildings and infrastructure while employing curved forms for natural boundaries, creating immediate visual distinction between development and environment.
Balance angular-curved combinations through systematic application that prevents visual chaos. Limit angular shapes to 60% of your design elements, curved forms to 30%, and mixed elements to 10% for optimal visual hierarchy and reader comprehension.
Conclusion
These seven contrast techniques provide you with a comprehensive toolkit for creating maps that truly communicate. When you combine color value texture size typography saturation and shape contrasts strategically you’ll transform confusing visualizations into clear compelling stories.
Remember that effective map design isn’t about using every technique simultaneously. You’ll achieve the best results by selecting the contrast methods that best serve your specific data and audience needs.
Start implementing these techniques one at a time and test how they perform across different devices and viewing conditions. Your maps will become more accessible engaging and professionally polished as you master each contrast principle.
The key to successful cartographic communication lies in thoughtful contrast application that guides your readers effortlessly through complex geographic information.
Frequently Asked Questions
What is map contrast and why is it important for data visualization?
Map contrast refers to the visual differences between elements on a map that help audiences distinguish and understand geographic information. Good contrast ensures readability across various devices and conditions, making maps effective communication tools. Poor contrast renders maps ineffective, preventing audiences from comprehending the data being presented.
How do complementary colors improve map readability?
Complementary colors like blue and orange or red and green create maximum visual separation, helping establish clear distinctions between different map elements. However, avoid red-green combinations for accessibility reasons. These strategic color choices create visual hierarchy that guides audiences through complex geographic information effectively.
What is value contrast and how does it help in map design?
Value contrast uses light and dark elements strategically to establish visual hierarchy and ensure readability even when color information is lost. It includes graduated value scales for representing data like elevation or population density, with specific opacity levels creating visual depth while maintaining clear separation between elements.
How can texture contrast enhance map visualization?
Texture contrast adds visual interest through pattern variations like hatching, cross-hatching, dot patterns, and stippling. Professional cartographers use specific line angles, intervals, and dot densities to create distinct textures for different map zones, allowing readers to differentiate areas instantly while maintaining visual clarity.
What role does size contrast play in effective map design?
Size contrast creates visual hierarchy by strategically scaling map elements based on importance. Critical elements should be 2-3 times larger than secondary features. For example, capital cities should appear 200-300% larger than regional towns. Progressive sizing helps represent quantitative data like population figures systematically.
How does typography contrast improve map communication?
Typography contrast uses strategic font choices, weights, and sizes to create clear information hierarchies. Bold weights highlight primary labels, while medium and light weights serve secondary information. Combining serif and sans-serif typefaces effectively distinguishes between human-made and natural features while maintaining readability.
What is saturation contrast and how should it be applied?
Saturation contrast manipulates color intensity to direct viewer attention. Vibrant colors highlight key areas while muted tones provide background stability. Follow the 70-20-10 rule for color distribution to maintain visual harmony. Test by converting maps to grayscale to ensure clear contrast relationships exist.
How does shape contrast help distinguish map elements?
Shape contrast uses geometric and organic forms to create immediate visual distinctions. Geometric shapes like circles and squares establish clear categorical boundaries for features like population centers and administrative areas. Organic shapes mirror natural patterns, creating intuitive connections while balancing angular and curved elements effectively.