6 Best Terrain Shading Techniques
The big picture: Creating compelling terrain shading requires walking a tightrope between photorealistic detail and artistic interpretation that serves your project’s needs.
Why it matters: You’ll face constant decisions about how much real-world accuracy to sacrifice for visual clarity, performance, or aesthetic goals when designing landscapes for games, films, or architectural visualizations.
What’s next: These six proven techniques will help you master the delicate balance between authentic terrain representation and stylized abstraction that enhances rather than overwhelms your creative vision.
Disclosure: As an Amazon Associate, this site earns from qualifying purchases. Thank you!
P.S. check out Udemy’s GIS, Mapping & Remote Sensing courses on sale here…
Start With Elevation-Based Color Gradients
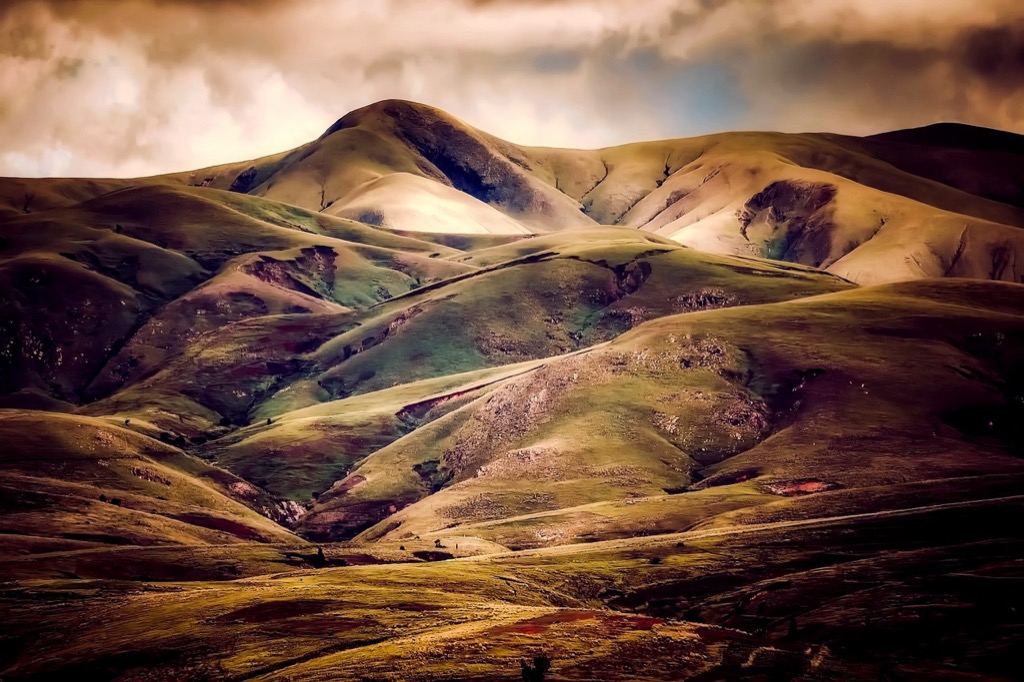
Elevation-based color gradients form the foundation of effective terrain shading by establishing clear visual hierarchy. You’ll create immediate depth perception when you map specific colors to elevation ranges.
Achieve a flawless, even complexion with e.l.f. Flawless Satin Foundation. This lightweight, vegan formula provides medium coverage and a semi-matte finish for all-day wear, while hydrating your skin with glycerin.

Use Natural Color Progressions From Valley to Peak
Start with deep greens or browns for valleys and transition through golden yellows to warm oranges at mid-elevations. Continue upward with cooler grays and whites for peaks above treeline. This natural progression mimics real-world vegetation zones and creates intuitive depth cues. You’ll find that viewers instantly understand elevation relationships without consulting legends when you follow these earth-tone sequences.
Apply Atmospheric Perspective Through Subtle Hue Shifts
Shift your elevation colors toward cooler blue-grays as elevations increase to simulate atmospheric effects. Lower elevations should maintain warmer, more saturated colors while higher peaks become progressively desaturated and cooler. This technique adds realism by replicating how distant mountains appear hazier and bluer. You’ll achieve more convincing depth when you gradually reduce color intensity by 10-15% for each major elevation band above your base level.
Incorporate Selective Detail Enhancement
Strategic detail placement transforms terrain shading from uniform coverage to focused visual storytelling that guides viewer attention effectively.
Focus High-Detail Areas on Points of Interest
Concentrate your highest resolution textures and detailed shading on key terrain features like mountain summits, canyon rims, and valley floors where viewers naturally focus. Apply fine-grained rock textures, detailed shadow casting, and intricate surface variations to these focal points while maintaining broader stroke treatments elsewhere. This approach mirrors photographic depth of field principles, creating visual hierarchy that draws attention to important landscape elements. Reserve complex procedural noise patterns and high-frequency detail maps for areas within 30% of your primary viewing zones to maximize visual impact without overwhelming system resources.
Simplify Background Elements to Reduce Visual Clutter
Reduce background terrain complexity through broader color zones, simplified shadow patterns, and lower-resolution texture applications that support rather than compete with foreground elements. Apply atmospheric haze effects and reduced contrast ratios to distant terrain features, allowing them to recede naturally while maintaining recognizable landscape structure. Use unified color temperatures and simplified geometric forms for background ridgelines and distant slopes. This selective simplification prevents visual noise while maintaining spatial relationships, ensuring your detailed focal areas command appropriate viewer attention without sacrificing overall terrain coherence or geographic context.
Layer Hand-Painted Textures Over Procedural Base
Hand-painted textures bring organic character to terrain shading while procedural bases provide structural foundation. This hybrid approach combines algorithmic efficiency with artistic control.
Create Custom Brush Strokes for Organic Feel
Apply directional brush strokes that follow natural terrain flow patterns like ridge lines and water erosion paths. Use varied opacity levels between 30-70% to create subtle texture variations that break up the mathematical uniformity of procedural generation. Paint weathering effects manually along cliff faces and exposed rock surfaces where natural processes create unique visual signatures. Custom brushwork adds the imperfections and asymmetries that make terrain feel authentically sculpted by time.
Maintain Consistent Light Source Throughout All Layers
Establish your primary light direction before painting any texture layers and maintain this angle across all hand-painted elements. Use shadow mapping techniques to ensure your brush strokes align with the procedural base lighting at approximately 45-degree angles for optimal depth perception. Check layer blend modes regularly using overlay or multiply settings to preserve underlying shadow information. Inconsistent lighting between layers creates visual disconnection that immediately reveals the artificial nature of your terrain shading system.
Utilize Strategic Contrast Management
You can dramatically improve your terrain shading by manipulating value relationships between different landscape elements. Strategic contrast management transforms flat terrain representations into dynamic visual hierarchies that guide viewer attention effectively.
Emphasize Key Terrain Features Through Value Contrast
Darken surrounding valleys by 15-20% to make prominent ridges and peaks appear more luminous without directly brightening them. Apply stronger shadows to cliff faces and steep slopes using values between 25-35% gray to create dramatic depth perception. Increase contrast ratios to 3:1 or 4:1 between highlighted summits and adjacent terrain features, ensuring primary landscape elements command immediate visual attention through strategic value placement.
Soften Secondary Elements to Support Main Focal Points
Reduce value contrast in background mountain ranges to 60-70% of foreground contrast levels, creating atmospheric recession that supports depth hierarchy. Blend secondary ridgelines using mid-tone values between 40-60% gray to prevent competition with primary terrain features. Apply subtle gradients across distant terrain elements, maintaining just enough definition to preserve landscape continuity while keeping secondary features visually subordinate to your main focal points.
Blend Realistic Lighting With Stylized Shadows
Combining accurate light physics with artistic shadow interpretation creates terrain shading that maintains believability while supporting your visual narrative goals.
Apply Accurate Light Physics to Primary Forms
Calculate accurate light angles and falloff patterns for your terrain’s major geological structures. Position your primary light source at realistic solar angles—typically 15-45 degrees above the horizon for natural daylight conditions. Apply proper inverse square falloff to light intensity across distance, ensuring that ridgelines and peaks receive appropriate illumination while valleys maintain realistic shadow depth. Use normal maps derived from elevation data to calculate precise surface angles, allowing light to interact authentically with slope gradients and rock face orientations.
Exaggerate Shadow Shapes for Artistic Impact
Extend shadow lengths beyond physically accurate measurements to create dramatic silhouettes and enhanced depth perception. Amplify the contrast between sunlit areas and shadow zones by darkening recessed terrain features like canyons and cliff overhangs by 20-40% more than realistic lighting would produce. Simplify complex shadow patterns into bold, readable shapes that support your composition’s visual flow. Adjust shadow colors toward cooler purples and blues rather than neutral grays, creating atmospheric mood while maintaining the underlying structure of realistic light direction.
Implement Controlled Color Temperature Variations
Color temperature variations create natural atmospheric effects that enhance terrain depth while maintaining visual clarity. This technique leverages the physiological way viewers perceive warm and cool colors to establish spatial relationships.
Use Warm Colors for Foreground Elements
Apply warmer color temperatures (yellows, oranges, reds) to terrain features closest to the viewer to establish immediate visual hierarchy. Warm-toned surfaces naturally advance in perception, making ridgelines and foreground slopes appear more prominent and accessible. Incorporate subtle amber undertones in your base terrain colors and emphasize sun-struck surfaces with golden highlights. This approach mirrors natural lighting conditions where direct sunlight creates warmer color casts on nearby geological features.
Apply Cool Tones to Create Atmospheric Depth
Introduce cooler color temperatures (blues, purples, grays) to distant terrain elements to simulate atmospheric perspective effects naturally. Cool colors recede visually, pushing background mountains and far valleys into appropriate spatial positions without requiring complex fog effects. Shift your distant terrain colors toward blue-gray ranges and reduce color saturation progressively with distance. This temperature gradient creates convincing depth cues that viewers instinctively understand, enhancing the three-dimensional quality of your terrain shading while maintaining clean, readable map aesthetics.
Conclusion
These six terrain shading techniques give you the tools to create compelling landscapes that serve your specific project needs. You’ll find that combining elevation gradients with atmospheric perspective creates natural depth while selective detail enhancement directs viewer focus exactly where you want it.
The key lies in understanding when to prioritize realism versus stylization. Hand-painted textures add organic character while strategic contrast management ensures your focal points remain clear and impactful.
Remember that effective terrain shading isn’t about choosing between realistic or abstract approaches—it’s about finding the sweet spot that supports your creative vision. Start with one or two techniques and gradually incorporate others as you develop your workflow.
Your terrain should tell a story through its visual hierarchy and mood. With these proven methods you’re equipped to create landscapes that balance authentic representation with artistic expression.
Frequently Asked Questions
What is the main challenge in creating effective terrain shading?
The primary challenge lies in balancing photorealistic detail with artistic interpretation to meet specific project requirements. Artists must make strategic decisions about trade-offs between real-world accuracy and visual clarity, performance constraints, or aesthetic goals depending on whether they’re working on games, films, or architectural visualizations.
How do elevation-based color gradients improve terrain shading?
Elevation-based color gradients establish visual hierarchy and depth perception by mimicking natural vegetation zones. Start with deep greens or browns in valleys, transition to warmer colors at mid-elevations, and finish with cooler grays and whites at peaks. This natural progression helps viewers intuitively understand elevation relationships.
What is selective detail enhancement in terrain shading?
Selective detail enhancement focuses high-detail textures and shading on key terrain features like mountain summits and canyon rims, creating visual hierarchy that draws attention. Background elements are simplified with broader color zones and lower-resolution textures, similar to photographic depth of field principles.
How can hand-painted textures improve procedural terrain shading?
Layering hand-painted textures over procedural bases combines organic character with structural foundation. Create custom brush strokes following natural terrain flow patterns with varied opacity levels to introduce subtle texture variations and weathering effects. Maintain consistent lighting across all layers for visual cohesion.
What is strategic contrast management in terrain shading?
Strategic contrast management involves manipulating value relationships between landscape elements to create dynamic visual hierarchies. Darken surrounding valleys and strengthen cliff face shadows to make primary features stand out, while softening contrasts in secondary elements to support main focal points without competition.
How do color temperature variations enhance terrain depth?
Use warm colors (yellows, oranges, reds) for foreground elements to establish immediate visual prominence, and apply cooler tones (blues, purples, grays) to distant features to simulate atmospheric perspective. This temperature gradient pushes background elements into appropriate spatial positions while maintaining clean, readable aesthetics.