
5 Best Tactile Maps for Cultural Heritage Accessibility
Cultural heritage sites across the globe are increasingly recognizing that accessibility isn’t just about compliance—it’s about creating meaningful experiences for all visitors. You’re missing out on connecting with millions of potential visitors if your site doesn’t offer tactile navigation options for people with visual impairments.
Creating effective tactile maps transforms how visitors experience historical landmarks and cultural treasures. These specialized maps use raised surfaces and varied textures to convey spatial information through touch rather than sight.
Explore geography in a new way with this 3D raised relief map. Developed by cartographers and molded by hand in the USA, this tactile map lets you see and feel the world's terrain.

The process involves more than simply converting visual elements to tactile ones—you’ll need to consider material selection user testing and strategic placement to ensure your maps truly serve their intended purpose.
Disclosure: As an Amazon Associate, this site earns from qualifying purchases. Thank you!
P.S. check out Udemy’s GIS, Mapping & Remote Sensing courses on sale here…
Step 1: Research and Document the Cultural Heritage Site
Thorough research forms the foundation of effective tactile map creation. You’ll need comprehensive documentation to translate visual heritage site elements into meaningful tactile experiences.
Achieve a flawless, even complexion with e.l.f. Flawless Satin Foundation. This lightweight, vegan formula provides medium coverage and a semi-matte finish for all-day wear, while hydrating your skin with glycerin.

Gather Historical Information and Context
Start by collecting historical documentation from archives, museums, and cultural organizations. Review original architectural plans, historical photographs, and site records to understand the heritage location’s evolution over time. Connect with local historians and site managers who possess institutional knowledge about significant events and cultural practices. This background information helps you determine which historical elements deserve emphasis in your tactile map design and ensures accuracy in representing the site’s cultural significance.
Conduct Site Surveys and Measurements
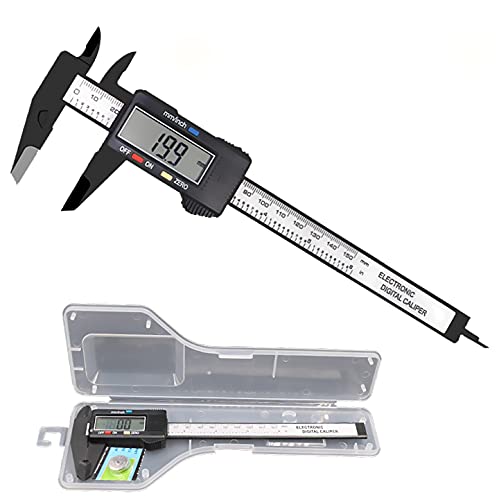
Perform detailed physical surveys using measuring tools like laser rangefinders and GPS units to capture precise dimensions. Document elevation changes, pathways, building footprints, and spatial relationships between structures through systematic measurement techniques. Take comprehensive photographs from multiple angles to support your tactile design process. Create scaled sketches that note materials, textures, and accessibility features you’ll encounter during fieldwork. These measurements provide the technical foundation for accurate tactile map production.
Get precise measurements with this digital caliper, featuring easy inch/millimeter conversion and a clear LCD display. Measure inner/outer diameters, depths, and steps with accuracy, plus enjoy automatic shutoff for extended battery life.
Identify Key Features and Points of Interest
Determine which site elements offer the most significant cultural and navigational value for tactile map users. Prioritize prominent structures, important historical locations, and essential visitor amenities like entrances and restrooms. Evaluate features based on their tactile translation potential – elements with distinct shapes and sizes work better than subtle details. Consult with accessibility experts and visually impaired visitors to understand which landmarks provide the most valuable orientation cues for independent navigation throughout the heritage site.
Step 2: Design the Tactile Map Layout and Structure
Your tactile map’s effectiveness depends on thoughtful design choices that translate visual information into meaningful touch experiences. You’ll need to balance spatial accuracy with tactile clarity while creating an intuitive navigation system.
Choose Appropriate Scale and Dimensions
Determine your map scale based on the site’s complexity and available space. Most effective tactile maps use scales between 1:100 and 1:500 for architectural elements, allowing fingers to distinguish individual features while maintaining overall context. You’ll want dimensions between 18×24 inches and 24×36 inches to accommodate comfortable arm reach and detailed exploration. Consider mounting height at 32-36 inches from ground level to ensure wheelchair accessibility and comfortable standing use.
Select Tactile Symbols and Textures
Create a consistent texture vocabulary that differentiates key site elements. Use raised dots for points of interest, parallel lines for pathways, and cross-hatching for building footprints. You’ll need distinct textures for different materials: smooth surfaces for modern structures, rough textures for historical stone, and dotted patterns for gardens or courtyards. Establish texture height differences of at least 1/16 inch between elements to ensure clear tactile distinction during exploration.
Plan Information Hierarchy and Navigation Flow
Organize tactile elements by importance and logical exploration sequence. Place the most critical navigation features—main entrances, pathways, and orientation landmarks—as the most prominent raised elements. You’ll create natural reading patterns by positioning detailed information near entry points and progressively revealing site complexity. Design clear tactile boundaries between sections and include reference points every 50-100 feet of pathway to maintain visitor orientation throughout their heritage site experience.
Step 3: Select Materials and Production Methods
Your material choices determine how well your tactile map withstands daily use while maintaining clear textures for navigation. The production method you select affects both durability and accessibility features.
Evaluate Durable and Weather-Resistant Materials
Bronze and aluminum offer excellent longevity for outdoor heritage sites, resisting corrosion and maintaining texture clarity for decades. Thermoformed plastics like ABS provide lightweight alternatives with good weather resistance at lower costs. High-density polyethylene (HDPE) works well for temporary installations, offering UV resistance and easy replacement. Stainless steel delivers premium durability but requires careful texture design to prevent finger cuts. Consider local climate conditions when selecting materials – coastal sites need superior corrosion resistance while desert locations require UV-stable options.
Consider Manufacturing Techniques and Budget Constraints
3D printing allows complex textures and cost-effective small batches, ideal for prototyping and budget-conscious projects. CNC machining provides precise detail reproduction in metals and plastics, though initial setup costs are higher. Vacuum forming offers economical production for larger quantities using thermoplastic sheets. Laser cutting creates clean edges and intricate patterns but limits material thickness options. Hand-crafted methods using traditional materials like wood or stone can complement heritage site aesthetics while requiring specialized artisan skills and extended timelines.
Create 3D art with the SCRIB3D P1 3D Pen! This easy-to-use pen features adjustable speed control and includes PLA filament, a stencil book, and project guide to get you started.

Ensure Accessibility Standards Compliance
ADA guidelines require raised elements between 0.03 and 0.06 inches high with clear tactile contrast between different surface textures. Braille labeling must follow Grade 2 standards with proper spacing and dot height specifications. Color contrast ratios of 3:1 minimum help visitors with low vision distinguish map elements. Mounting height should place the map center between 28-34 inches from ground level for wheelchair accessibility. Edge protection and rounded corners prevent injury while maintaining tactile clarity. Test all materials for appropriate friction levels that allow comfortable finger movement without excessive resistance.
Step 4: Create and Test the Tactile Map Prototype
Building your tactile map prototype transforms your design specifications into a tangible navigation tool. This critical phase validates your material choices and design decisions through real-world testing with your intended users.
Develop Initial Prototype Using Selected Materials
Create your prototype using the materials and production methods you’ve selected based on your site’s requirements. Start with a scaled-down version at 50-75% of final size to minimize material costs while maintaining proportional accuracy. Use your chosen manufacturing technique—whether 3D printing, CNC machining, or molding—to produce raised elements with consistent texture vocabulary. Apply your established height standards of 0.6-3mm for different features and ensure proper contrast ratios meet accessibility guidelines. Document production time and material usage to refine your budget estimates for the final installation.
Conduct User Testing with Visually Impaired Individuals
Test your prototype with 5-8 visually impaired individuals representing different skill levels and tactile reading abilities. Schedule 30-45 minute sessions where participants navigate the map independently while you observe their finger placement patterns and hesitation points. Record specific feedback about texture differentiation, element spacing, and information hierarchy clarity. Ask participants to identify key landmarks, trace pathways, and locate points of interest to evaluate navigation effectiveness. Document any confusion points or areas where users require additional verbal guidance to complete tasks successfully.
Refine Design Based on Feedback and Usability Results
Analyze user testing data to identify recurring navigation challenges and texture recognition issues. Modify element heights, spacing, or textures based on specific feedback patterns—for example, increasing contrast between pathway textures if multiple users struggled with differentiation. Adjust information density in areas where users reported overcrowding or confusion during exploration. Create a second prototype iteration incorporating these changes and conduct follow-up testing with 2-3 original participants to validate improvements. Document all modifications with before-and-after comparisons to inform your final production specifications.
Step 5: Install and Maintain the Finished Tactile Map
Installing your tactile map marks the culmination of your accessibility enhancement project. Proper installation and ongoing maintenance ensure your tactile heritage map serves visitors effectively for years to come.
Prepare Installation Site and Mounting Systems
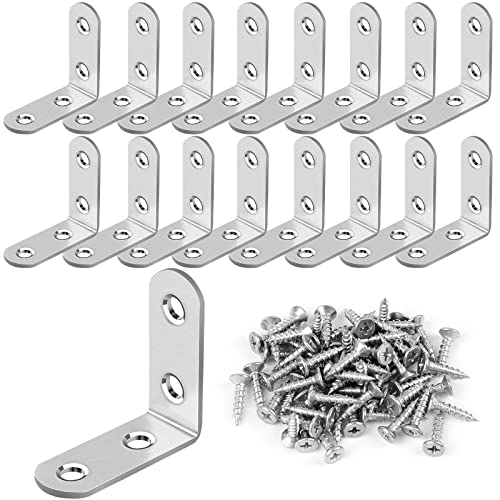
Select mounting locations that provide optimal visitor access while protecting the tactile map from environmental damage. Choose areas with adequate lighting and clearance space of at least 3 feet on all sides for wheelchair accessibility. Install weather-resistant mounting systems using stainless steel brackets or aluminum frames rated for your local climate conditions. Ensure the mounting height positions the map’s center between 36-48 inches from ground level to accommodate standing and seated users comfortably.
Reinforce furniture joints with this 16-piece L bracket set. Made of durable stainless steel with countersunk screw holes for easy, flush installation.
Implement Regular Maintenance and Update Schedules
Establish weekly cleaning protocols using soft brushes and mild detergent solutions to remove debris from raised tactile elements without damaging surface textures. Schedule monthly inspections to check for loose mounting hardware, worn tactile features, and damaged Braille labels that require replacement. Plan annual comprehensive assessments involving accessibility experts to evaluate ongoing effectiveness and identify necessary updates reflecting site changes or visitor feedback patterns.
Achieve smooth, healthy hair with the Diane Boar Bristle Brush. Designed for fine to medium hair, it distributes natural oils for shine and features a durable wood base with secure bristles.

Monitor Usage and Gather Ongoing User Feedback
Track visitor engagement patterns through observation and informal surveys to assess navigation success rates and identify common confusion points. Collect structured feedback from visually impaired users quarterly using brief questionnaires about map clarity, texture effectiveness, and overall navigation experience. Document usage data and maintenance issues in a tracking system to inform future tactile map projects and justify continued investment in accessibility improvements at your cultural heritage site.
Conclusion
Creating tactile maps for cultural heritage sites transforms accessibility from obligation into opportunity. When you invest time in proper research design testing and installation you’re building bridges that connect all visitors to your site’s rich history.
Your commitment to accessibility doesn’t end with installation. Regular maintenance and visitor feedback ensure your tactile maps continue serving their purpose effectively. Remember that each map you create sets a precedent for inclusive heritage preservation.
The five-step process you’ve learned provides a roadmap for meaningful change. Start with one site and watch how tactile accessibility enhances the experience for everyone who visits. Your efforts today create lasting impact that extends far beyond compliance requirements.
Frequently Asked Questions
What are tactile maps and why are they important for cultural heritage sites?
Tactile maps are navigation tools that use raised surfaces and textures to provide spatial information through touch. They’re crucial for cultural heritage sites because they enhance accessibility for visually impaired visitors, going beyond mere compliance to create inclusive experiences. These maps help all visitors better understand and navigate historical sites while preserving cultural significance.
What materials work best for outdoor tactile maps at heritage sites?
Bronze and aluminum are excellent choices for outdoor installations due to their durability and weather resistance. High-quality plastics can also work well depending on local climate conditions. The key is selecting materials that can withstand environmental factors while providing appropriate texture and friction levels for comfortable tactile navigation.
What scale and dimensions are recommended for tactile maps?
Tactile maps should typically use scales between 1:100 and 1:500 for optimal detail representation. Recommended dimensions range from 18×24 inches to 24×36 inches, allowing comfortable exploration without overwhelming users. These specifications ensure visitors can easily reach all areas of the map while maintaining sufficient detail for effective navigation.
How do you create an effective texture vocabulary for tactile maps?
Develop a consistent system where different textures represent specific elements. For example, use raised dots for points of interest, parallel lines for pathways, and varied surface heights for different building types. This vocabulary should be logical, memorable, and clearly distinguished through touch to prevent confusion during navigation.
What accessibility standards must tactile maps meet?
Tactile maps must comply with ADA guidelines, including specific requirements for raised element heights, Braille labeling, color contrast ratios, and mounting heights. Elements should be raised at least 1/32 inch, mounted between 28-44 inches high, and include both tactile and visual information to serve users with varying abilities.
How important is user testing in tactile map development?
User testing with visually impaired individuals is critical for creating effective tactile maps. This process validates design decisions, identifies navigation challenges, and ensures the map meets real user needs. Testing should occur during prototype development and continue after installation to gather ongoing feedback for improvements.
What maintenance is required for tactile maps at heritage sites?
Regular maintenance includes cleaning to remove debris that could interfere with tactile reading, inspecting for wear or damage, and monitoring mounting systems for stability. Establish a routine inspection schedule and promptly address any issues to ensure the map remains accessible and effective for all visitors.
How do you identify key features to include on a tactile map?
Prioritize elements with high cultural and navigational value that can be effectively translated into tactile experiences. Focus on main pathways, significant buildings, important artifacts, and orientation landmarks. Consult with accessibility experts and conduct thorough site surveys to determine which features are most essential for visitor navigation and understanding.