9 Ways to Prepare Maps for Large Scale Printing Like Pro Cartographers
Why it matters: Large-scale map printing transforms your digital cartographic work into impressive physical displays but requires specific preparation techniques to ensure crisp results and accurate color reproduction.
The challenge: Most maps created for screen viewing aren’t optimized for print production and can result in blurry text pixelated graphics or washed-out colors when scaled up to poster or banner size.
What you’ll learn: This guide covers essential preparation steps including resolution requirements color profile management and file formatting that’ll help you create stunning large-format maps ready for professional printing.
Disclosure: As an Amazon Associate, this site earns from qualifying purchases. Thank you!
P.S. check out Udemy’s GIS, Mapping & Remote Sensing courses on sale here…
Understanding Large Scale Map Printing Requirements
Preparing maps for large-scale printing demands technical precision that extends beyond your typical screen display requirements. You’ll need to address specific printing standards that ensure your cartographic work translates effectively from digital formats to physical media.
Resolution and DPI Standards
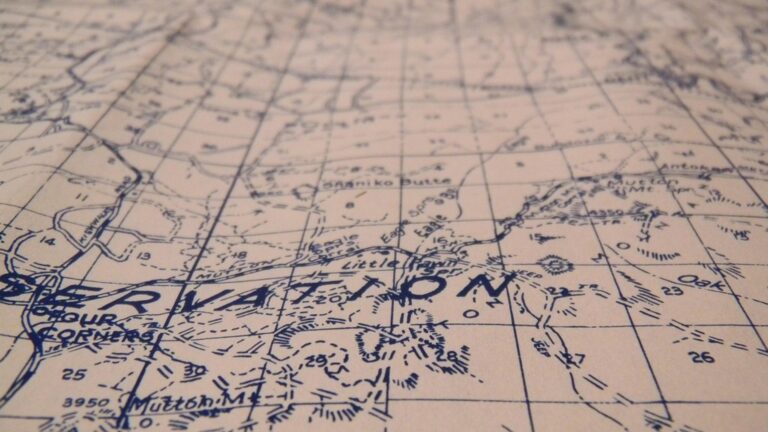
Set your map resolution to 300 DPI minimum for professional large-scale printing output. This standard ensures crisp text rendering and sharp boundary lines when your map spans poster-sized dimensions or larger display formats.
Configure your mapping software to export at 600 DPI for extremely detailed cartographic elements like contour lines, property boundaries, or technical annotations. Higher DPI settings prevent pixelation when viewers examine your printed map at close range, maintaining professional cartographic standards throughout the scaling process.
File Format Considerations
Choose TIFF format for large-scale map printing to preserve maximum image quality and color depth. TIFF files support lossless compression while maintaining the precise cartographic detail required for professional printing applications.
Export maps as PDF format when working with vector-based cartographic elements like road networks, administrative boundaries, or symbol libraries. PDF files retain scalable vector properties that prevent quality degradation during the printing process, ensuring your map elements remain sharp at any print dimension.
Color Space and Profile Management
Convert your map to CMYK color space before submitting files to commercial printing services. Screen displays use RGB color models that don’t translate directly to printing inks, potentially causing unexpected color shifts in your final cartographic output.
Embed ICC color profiles specific to your printer’s capabilities to maintain color accuracy across different printing systems. Professional cartographic work requires consistent color reproduction, particularly for elevation data, land use classifications, or thematic mapping elements that rely on precise color differentiation.
Selecting the Right Map Data Sources
Quality large-scale print maps require carefully selected data sources that can handle high-resolution output without degradation. Your choice of data directly impacts the final print quality and visual clarity.
High-Resolution Satellite Imagery
You’ll need satellite imagery with pixel resolution of 0.5 meters or better for large-scale printing applications. Commercial providers like Maxar and Planet offer imagery up to 0.3-meter resolution that maintains clarity when scaled for wall-sized displays. Avoid free satellite data sources like Landsat for detailed printing since their 30-meter resolution creates pixelated results. Download imagery in GeoTIFF format to preserve geographic coordinates and prevent compression artifacts that degrade print quality.
Vector-Based Geographic Data
Vector data sources provide scalable elements that won’t pixelate during large-format printing processes. OpenStreetMap offers comprehensive vector datasets for roads, buildings, and boundaries that scale infinitely without quality loss. Government sources like TIGER/Line files from the US Census Bureau provide authoritative boundary data in shapefile format. Always verify vector topology before printing to eliminate gaps or overlapping polygons that create visual artifacts on large displays.
Topographic Survey Information
High-accuracy elevation data from LiDAR surveys delivers the precision needed for detailed topographic printing applications. USGS provides 1-meter resolution digital elevation models that support contour generation at 2-foot intervals for professional cartographic standards. State geological surveys often maintain higher-resolution datasets with sub-meter accuracy for critical infrastructure mapping. Process elevation data through specialized GIS software like ArcGIS or QGIS to generate smooth contour lines that print cleanly at large scales.
Optimizing Map Design for Print Scale
Print scaling demands careful adjustment of visual elements to maintain readability and professional appearance across different output sizes.
Typography and Label Sizing
Typography requires systematic scaling to ensure text remains legible at your target print dimensions. Calculate your final print scale factor and multiply all font sizes accordingly – a 12-point label on screen becomes 24-point for 200% enlargement. Use font weights of medium or bold for body text, as regular weights often appear too thin in large-format printing. Test critical labels by printing sample sections at actual size before committing to full production.
Symbol and Icon Scaling
Symbol scaling maintains visual hierarchy while preserving map functionality across print sizes. Apply consistent scaling ratios to all point symbols – if you’re doubling map size, double symbol dimensions proportionally. Simplify complex icons for large-scale output by removing fine details that become visually cluttered. Vector-based symbols scale cleanly without pixelation, making them essential for professional large-format maps where raster symbols would degrade.
Line Weight Adjustments
Line weights need proportional increases to maintain visibility and visual balance in large prints. Standard 1-point screen lines should become 2-3 points for poster-sized output to prevent appearing too thin. Create distinct visual hierarchy by using varied line weights – major roads at 3-4 points, secondary roads at 2 points, and minor features at 1 point. Avoid hairline weights below 0.5 points as they may not reproduce consistently on large-format printers.
Setting Up Proper Document Dimensions
Establishing precise document dimensions forms the foundation for successful large-scale map printing. Your digital canvas must accommodate both the final print size and technical printing requirements.
Achieve a flawless, even complexion with e.l.f. Flawless Satin Foundation. This lightweight, vegan formula provides medium coverage and a semi-matte finish for all-day wear, while hydrating your skin with glycerin.

Calculating Final Print Size
Determine your target dimensions by measuring the intended display space first. Add 10-15% to your base measurements to account for mounting hardware and framing requirements. For example, a 36″ x 24″ wall display typically requires a 40″ x 28″ printed map.
Create your document at actual print size rather than scaling up smaller files. Set your GIS software canvas to match these exact dimensions in inches or centimeters. Export settings should maintain 1:1 scale ratio to prevent interpolation artifacts during the printing process.
Establishing Bleed Areas
Add 0.25″ bleed zones around all document edges to prevent white borders from printing errors. Commercial printers require this extra area to accommodate slight cutting variations during the trimming process.
Extend all background colors, imagery, and border elements into the bleed area. Keep critical map elements like legends, scale bars, and title blocks at least 0.5″ away from the trim edge. Configure your export settings to include bleed areas in the final file dimensions.
Margin and Safe Zone Planning
Maintain minimum 1″ margins from trim edges for all essential map content. This safe zone protects important information from being cut off during printing or mounting processes.
Position your legend, north arrow, and scale information within this safe zone boundary. Create visual guides in your design software to mark both the safe zone (1″ from edges) and the critical zone (0.5″ from edges) for different content priorities. Test print small sections to verify margin adequacy before full-scale production.
Preparing Vector Elements for Large Format
Vector elements require specific preparation techniques to maintain quality and prevent printing errors at large scales.
Converting Text to Outlines
Convert all text elements to outlines before sending your map to print to eliminate font substitution issues. This process transforms text into vector paths, ensuring your carefully chosen typography appears exactly as designed. Most design software offers this function through “Create Outlines” or “Convert to Curves” commands. You’ll preserve custom fonts and prevent printing services from replacing missing typefaces with default alternatives that could compromise your map’s professional appearance.
Simplifying Complex Path Objects
Simplify intricate vector paths to reduce file size and processing time during large-format printing. Complex coastlines, detailed building footprints, and ornate cartographic elements often contain excessive anchor points that printers struggle to process. Use your software’s “Simplify” or “Reduce Points” tools to remove redundant vertices while maintaining visual accuracy. Target a 10-20% reduction in anchor points for most geographic features without sacrificing essential detail or cartographic integrity.
Organizing Layer Structure
Organize your vector layers systematically to streamline the printing workflow and troubleshoot potential issues quickly. Group related elements like roads, labels, and boundaries into clearly named layers with logical hierarchies. Place background elements at the bottom and foreground details at the top of your layer stack. You’ll enable print technicians to isolate problematic elements and make necessary adjustments without disrupting your entire map composition during the production process.
Managing Raster Images and Imagery
Raster imagery requires careful preprocessing to maintain visual quality across large-scale prints. You’ll need to balance file size with image clarity while ensuring seamless integration with vector elements.
Image Resolution Optimization
Set source imagery to match your final print resolution requirements. You’ll achieve optimal results by resampling satellite imagery and aerial photographs to 300-600 DPI at actual print size. Use bicubic resampling in GDAL or ArcGIS Pro to preserve edge detail while avoiding pixelation. Compress high-resolution imagery using LZW compression in TIFF format to maintain quality while reducing file sizes by 30-50%.
Compression Settings
Apply lossless compression techniques to preserve critical map detail. You’ll want to use LZW or ZIP compression for continuous-tone imagery and PackBits for simple graphics. Set JPEG quality to 95% minimum when lossy compression is necessary for file size management. Configure compression in GIS software to maintain 16-bit color depth for satellite imagery and avoid visible artifacts in gradient areas like elevation shading.
Tiling Large Datasets
Divide extensive raster datasets into manageable tiles for efficient processing. You’ll need to create overlapping tiles with 10-15% buffer zones to prevent edge artifacts during printing. Use pyramid building in ArcGIS or QGIS to generate multiple resolution levels for smooth rendering. Organize tiles in a systematic grid pattern and maintain consistent naming conventions to ensure seamless reassembly during final print preparation.
Color Management and Proofing
Accurate color reproduction becomes critical when your map transitions from screen to large-scale print. Professional printing requires precise color management workflows that ensure your carefully designed cartographic elements maintain their visual integrity across different output devices.
CMYK Conversion Process
Convert your RGB map files to CMYK color space using professional software like Adobe Photoshop or ArcGIS Pro before sending to print. Set your conversion profile to match your printer’s specificationsâtypically US Web Coated SWOP v2 for offset printing or your printer’s custom ICC profile. Monitor gamut warnings during conversion and adjust oversaturated colors manually. Test conversion settings on small map sections first to identify problematic color combinations before processing your entire dataset.
Pantone Color Matching
Specify Pantone colors for critical map elements like organizational logos, brand colors, or standardized cartographic symbols that require exact color matching. Use the Pantone Color Bridge guide to identify CMYK equivalents and communicate specific Pantone numbers to your print vendor. Reserve spot colors for elements where precise color matching justifies the additional printing cost. Document your Pantone selections in a separate color reference sheet that accompanies your print files.
Soft Proofing Techniques
Simulate final print output on your monitor using soft proofing tools in Adobe Creative Suite or specialized proofing software like GMG ColorProof. Configure your display with the printer’s ICC profile and paper stock specifications to preview how colors will appear in print. Compare soft proofs against hard proofs when available and adjust map colors based on anticipated shifts. Enable gamut warnings to identify colors that fall outside your printer’s reproducible range before finalizing your design.
File Export and Pre-Press Preparation
Your final export settings determine whether your carefully prepared map achieves professional print quality or falls short of expectations.
PDF Creation Settings
Configure your PDF export with press-ready settings to maintain maximum print quality. Select PDF/X-1a or PDF/X-4 standards in Adobe Acrobat or your design software to ensure color accuracy and prevent transparency issues. Set compression to maximum quality for images while maintaining vector sharpness for text and line work. Embed all fonts and ICC color profiles to guarantee consistent reproduction across different printing systems. Include crop marks and bleed areas in your export settings to guide the printing press operator during final trimming.
Print-Ready File Formats
Choose TIFF format for raster-heavy maps requiring maximum image fidelity and color depth control. Export vector-based maps as high-resolution PDF files to preserve crisp text and scalable elements without quality degradation. Consider EPS format for maps with complex vector graphics that need editing flexibility during the pre-press workflow. Package native design files (AI, INDD) with linked assets when collaborating with print service providers who prefer working with original source files for quality control adjustments.
Quality Control Checklist
Verify your map resolution meets minimum 300 DPI requirements by checking actual pixel dimensions against final print size. Confirm all text remains legible at actual print scale by viewing your file at 100% magnification on screen. Check color values stay within CMYK gamut limits using your design software’s separation preview to identify potential printing issues. Review bleed areas extend 0.125 inches beyond trim marks and ensure no critical elements fall within the safety margin zones you established during document setup.
Working with Print Service Providers
Successful large-scale map printing requires clear communication with professional print providers. You’ll need to establish technical requirements and maintain quality control throughout the production process.
Communication Requirements
Contact your print service provider early in your project planning phase to discuss specific requirements for large-scale map reproduction. Provide detailed information about your intended map size, paper type preferences, and expected print quantities to ensure accurate cost estimates and timeline planning.
Share your color management workflow and request their preferred ICC profiles for accurate color matching. Discuss any special finishing requirements like mounting, lamination, or weather-resistant coatings that might affect your file preparation process.
Technical Specifications
Request your printer’s complete technical specification sheet including maximum print dimensions, supported file formats, and minimum resolution requirements for your intended output size. Verify their color gamut capabilities and preferred color space settings to match your map’s color requirements.
Confirm bleed requirements, typically 0.25 inches for large format printing, and ask about their preferred raster image processing settings. Document their turnaround times for different project sizes and establish file delivery methods that accommodate large map files exceeding several gigabytes.
Proofing and Approval Process
Establish a clear proofing workflow that includes both digital soft proofs and physical color-matched proof prints before full production begins. Request that initial proofs focus on critical map elements like legend readability, coordinate grid accuracy, and color reproduction of key geographic features.
Schedule an in-person proof review when possible to evaluate print quality under proper lighting conditions. Plan for multiple proof iterations and build approval timeframes into your project schedule, as large-scale map printing often requires fine-tuning to achieve optimal results.
Troubleshooting Common Large Scale Printing Issues
Large-scale map printing often presents technical challenges that can compromise your final output quality. Identifying and resolving these issues early prevents costly reprints and ensures professional results.
Memory and Processing Limitations
Memory constraints frequently crash GIS software when processing high-resolution map files exceeding 2GB. You’ll need to partition complex datasets into smaller tiles using ArcGIS Data Management tools or QGIS Processing algorithms. Configure your software to use disk-based processing rather than RAM-only operations, and consider upgrading to 32GB RAM minimum for seamless large-format workflows. Close unnecessary applications and increase virtual memory allocation to 150% of your physical RAM capacity.
Color Reproduction Problems
Color shifts between screen display and print output typically result from improper CMYK conversion or mismatched ICC profiles. You should calibrate your monitor using X-Rite ColorMunki or similar tools, then soft-proof your maps using your printer’s specific ICC profile in Adobe Photoshop or Illustrator. Convert oversaturated RGB blues and greens manually using selective color adjustments, and request printed color swatches from your service provider to verify critical cartographic elements like water bodies and vegetation.
Get precise color and sheen matching with the COLOR MUSE 2. This compact colorimeter identifies paint colors and sheen levels, connecting wirelessly to the Color Muse app for effortless color analysis from top brands.
Registration and Alignment Concerns
Misaligned map elements occur when vector and raster layers don’t properly register during large-format printing. You must verify all coordinate systems match exactly using QGIS’s coordinate reference system checker, and export final files with identical spatial extents down to decimal precision. Add registration marks at each corner using your design software, and request your printer perform test alignments on smaller sections before full production runs.
Conclusion
Large-scale map printing requires meticulous attention to technical details that can make or break your final output. By following proper resolution standards color management protocols and file preparation techniques you’ll transform your digital maps into stunning physical displays that maintain their visual integrity and professional appearance.
Remember that successful large-scale printing isn’t just about having the right dataâit’s about optimizing every aspect of your workflow from initial design through final export. Working closely with your print service provider and conducting thorough quality checks will save you time money and frustration while ensuring your maps meet the highest professional standards.
With these techniques in your toolkit you’re ready to tackle any large-scale printing project with confidence knowing your maps will deliver the impact and clarity your audience deserves.
Frequently Asked Questions
What resolution should I use for large-scale map printing?
Use a minimum of 300 DPI for crisp text and sharp lines in large-scale map printing. For maps with intricate details or fine elements, increase the resolution to 600 DPI. This ensures professional-quality output with clear, readable text and precise geographic features that won’t appear blurry or pixelated when printed at large sizes.
Which file format is best for printing large maps?
TIFF format is recommended for raster-heavy maps requiring maximum image quality, while high-resolution PDF works best for vector-based maps. PDF/X-1a or PDF/X-4 standards ensure press-ready files. Avoid JPEG format as it causes quality loss through compression, which becomes especially noticeable in large-scale prints.
Why should I convert my map to CMYK color space?
CMYK color space matches the ink colors used in professional printing (Cyan, Magenta, Yellow, Black), ensuring accurate color reproduction. RGB colors displayed on screens often can’t be reproduced exactly in print, leading to unexpected color shifts. Converting to CMYK and embedding ICC color profiles prevents disappointing results and maintains color consistency.
What are the best data sources for high-quality printed maps?
Use high-resolution satellite imagery from providers like Maxar and Planet for detailed base layers. Combine with vector-based geographic data from OpenStreetMap for roads and boundaries. For topographic maps, incorporate high-accuracy elevation data from LiDAR surveys or USGS digital elevation models to ensure professional-quality geographic accuracy.
Learn essential map reading and navigation skills with this U.S. Army guide. Designed for practical use, it provides clear instructions for navigating any terrain.

How do I prepare my map design for large-scale printing?
Adjust typography and labels for the final print scale, ensuring text remains readable at the intended viewing distance. Scale symbols and adjust line weights to create proper visual hierarchy. Organize elements in safe zones away from trim edges, establish bleed areas, and maintain a 1:1 scale ratio between your design file and final print dimensions.
What is soft proofing and why is it important?
Soft proofing simulates how your map will look when printed by applying printer-specific color profiles to your screen display. This technique helps identify potential color issues before printing, allowing you to make necessary adjustments. It’s essential for ensuring colors maintain their integrity and preventing costly reprints due to unexpected color shifts.
How should I handle large datasets for printing?
Tile large datasets into manageable sections with slight overlaps to prevent processing crashes and memory issues. Use bicubic resampling for image scaling and apply lossless compression techniques. Organize tiles systematically for easy reassembly during final print preparation, ensuring seamless integration of all map elements.
When should I contact my print service provider?
Contact your print provider early in the project to discuss technical requirements including maximum print dimensions, preferred file formats, paper types, and color management workflows. Share your specifications upfront and establish a proofing workflow that includes both digital and physical proofs to ensure optimal print quality and avoid production delays.
What common printing issues should I watch for?
Monitor for memory limitations that can crash GIS software, color reproduction problems from uncalibrated displays, and registration issues between vector and raster layers. Partition complex datasets, calibrate your monitor regularly, and ensure proper layer alignment. Address these technical challenges early to maintain high-quality output and avoid expensive reprints.
How do I set up proper bleed areas for large maps?
Add bleed areas extending 0.125 to 0.25 inches beyond your trim line, depending on print size and provider requirements. Ensure all background elements extend into the bleed zone to prevent white edges after trimming. Keep important text and graphics within safe zones, typically 0.25 inches from the trim edge, to avoid accidental cropping during production.